CP5070-2021-2B07-Group5-Iman

Friday, 18 February 2022

Project Development

What is my group chemical device?

  • Half-boiled egg cooker prototype. 
  • Is to assist coffee shop workers with their job.
  • Perfectly cooked half-boiled eggs by using our device without any human error.

How does it work? 

  • When the temperature of the water is at the right temperature. 
  • The egg will be submerged into the pot of hot water. 
  • The timer will start when the egg is submerged. 
  • The egg will be lifted up after a specific time.
  • Therefore, the consistent perfectly cooked half-boiled egg is achieved. 

How my team planned, allocated the tasks, and executed the project

Step 1: We used the design thinking process. Eg: Ideations of the product, TRIZ and Part -whole analysis.

Step 2: We formed the BOM (BILL OF MATERIALS). 

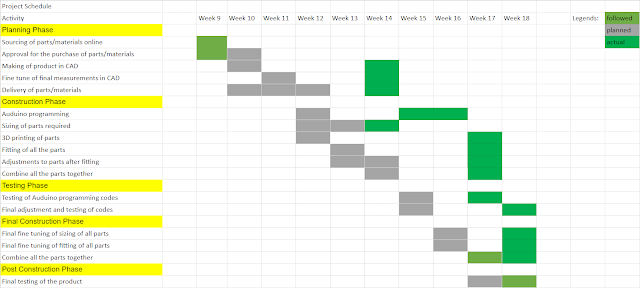
Step 3: We formed the Gantt chart. 

Step 4: Allocation of the task.

Task

Name

CAD modelling of frame, box, attachments

Frame construction

Gather materials, components

Alex

3D printing of attachments

DC motor coding

Emily

Temperature sensor coding

Test run for combined code

Iman

Laser-cutting of box

Syufyan

Product assembly

Everyone


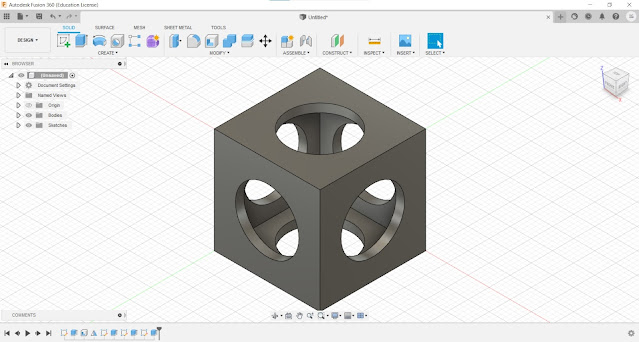
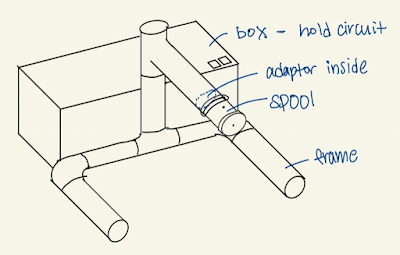
Design and build process of the Half-boiled egg cooker  

Part 1 : 
CAD modelling of the frame, box, attachments (Done by Alex)

Part 2 : 
3D printing of attachments and DC Motor code (Done by Emily)
Part 3: 
Temperature sensor code and combine code for a test run (Done by myself(Iman))

How do I code the temperature sensor in Arduino?
Step 1: Research the DS18B20 temperature sensor on the internet.
Step 2: Learn how it works on Youtube.
Step 3: Build the circuit. Source: Click this link

Step 4: Install library for the DS18B20 Temperature sensor into Arduino IDE. 


Step 5: Coding on Arduino. 

Step 6: Test the code. 

One important component for the DC Motor is L298N (H-Bridge)

This L298N (H-Bridge) will help to provide power to the DC motor. If we use a bigger DC motor, we can supply more voltage to H-bridge to power the motor. 
Furthermore, it will help to change the direction of the motor. For example, from clockwise motion to anti-clockwise motion. 

Combine the 3 components into one circuit

We added 2 powerbank to power the Arduino Maker Uno and H-bridge for portability. Furthermore, we add an on/off switch so that it is easy to turn on/off with the box.  

Combine the 2 codes (Temperature sensor and DC motor) 
*The final combined code


Part 4 : 
Laser-cutting of the box (Done by Syufyan)

Problems and solutions: 
Problems
  • The basket was not in the right starting position 
  • The code only runs when the temperature is at the set point.
  • The DC motor does not have the braking power needed to hold the basket in place (gravity) 
Solution
  • The rest of the code runs when the temperature has been reached. 
  • Use a bit of power to hold the motor to hold it in place.
  • Using the absent braking power - let gravity pull the basket down.  
Project design file as downloadable files : 


Sunday, 23 January 2022

Design of experiment

DOE CASE STUDY 2 

In a waste water treatment facility, a combination of coagulant chemicals, treatment temperature and stirring speed were identified as a critical factor to treat the waste-water to produce clean water. The clean water produced is recycled back into the main proses and at the same time reduce the amount of pollutant discharged by the plant.

8 runs were performed and the data are shown below. 

The response variable (y) is the amount of pollutant discharged (lb/day) 

A = concentration of coagulant added, 1% and 2% by weight 

B = treatment temperature, 72oC and 100oF 

C = Stirring speed, 200 rpm and 400 rpm

FULL factorial


Factor C, Stirring speed, is the most significant factor that affects the amount of pollution discharged (lb/day). 
Factor B, treatment temperature, is the second most significant factor that affects the amount of pollution discharged (lb/day). 
Factor A, concentration of coagulant added, is the least significant factor that affects the amount of pollution discharged (lb/day). 


The gradient of both lines is different by a little margin. Therefore there’s an interaction between A and B, but the interaction is small. If both lines are parallel, then there’s NO interaction


The gradient of both lines are different (one is + and the other is -). Therefore there’s a significant interaction between A and C


The gradient of both lines is different by a large margin. Both lines are parallel, there’s NO interaction.

Conclusion:
Factor C, Stirring speed, is the most significant factor that affects the amount of pollution discharged (lb/day). Also, there’s a significant interaction between A and C.

FRACTIONAL factorial


Factor C, Stirring speed, is the most significant factor that affects the amount of pollution discharged (lb/day). 
Factor A, concentration of coagulant added, is the second most significant factor that affects the amount of pollution discharged (lb/day). 
Factor B, treatment temperature, is the least significant factor that affects the amount of pollution discharged (lb/day). 


The gradient of both lines are different (one is + and the other is -). Therefore there’s a significant interaction between A and B.


The gradient of both lines are different (one is + and the other is -). Therefore there’s a significant interaction between A and C.


The gradient of both lines are the same. Therefore there’s a small significant interaction between A and C.

Conclusion:
Factor C, Stirring speed, is the most significant factor that affects the amount of pollution discharged (lb/day). There’s a significant interaction between A and B. Also, there’s a significant interaction between A and C.

To download the excel file:

Friday, 31 December 2021

3D Printing

How do I design a sphere inside a cube?

1. Open Fusion 360.

2. Left click on 'Sketch' then click 'Rectangle'.

3. Click on the XY plane. 

4. Draw square 25mm x 25mm.


5. Extrude the box to 12.5 mm


6. Select MODIFY Shell, click on the top surface of the box. Wall thickness 2mm.  


7. Select CREATE Mirror. The object is the box and the mirror plan is the top surface of the box. 


8. Cut the 15mm diameter holes through the side faces of the cube. Select SKETCH Centre Diameter Circle tool and select the face of the cube. 

9. Use the Extrude tool to cut the hole. 

10. Repeat steps 8 and 9 on 2 other sides. 

11. Select MODIFY Fillet and then left-click on each of the 12 corners. Fillet 1.5mm. 

12. Select CONSTRUCT Offset plane. Offset plane to -12.5mm.

13. Select SKETCH Centre Diameter Circle tool and select the offset plane. Sketch 16mm circle. 

14. Make a semicircle from the 16mm circle. By sketch the straight line and then select MODIFY Trim. 

15. Select CREATE Revolve.

16. Combine the 2 bodies (cube and ball) and the design is complete. 

Why it could not be easily made subtractively? 
It is because the ball is trapped inside the cube. It only can be replicated by printing in one go using a 3D printer. 

Sphere inside cube


Cura settings using Creality Endure 3


My hero shot 


Reflection 
I feel that the 3D printing of a sphere inside a cube is really fun. It makes me think that how powerful the 3D printer technology is. There are some challenges that occur after finishing the printing, the support for the sphere is quite thick and it's hard to take out. Next time, I will increase the diameter of the sphere so that there is less support and easy to take out. 
Designed By Blogger Templates