CP5070-2021-2B07-Group5-Iman

Monday, 29 November 2021

Arduino programming

How do I program the Arduino board?

Step 1: Connect Arduino Maker Uno to computer via USB cable 

Step 2: Open Arduino IDE software


Step 3: Do your own coding or just copy from the internet.

Using tinkercad  

1. Potentiometer with the serial monitor 

 
2. LDR with the serial monitor 


3. 3 LEDs (fade)


4. DC motor with on/off push button.

What I learned from interfacing an input device to Arduino board? 

In the unicorn challenge, I used pin 2 as an input device. I learned that when the programmable button is pressed the output device is on. When the button is released, the output device is off.  

What I learned from interfacing an output device to arduino board? 

In the unicorn challenge, I used pin 9 as an output device for the servo. I learned that if we use pin 11 as the output device. We didn't change the pinMode(9, OUTPUT) to pinMode(11, OUTPUT) the servo will not work as the data cannot be transferred to the servo. 

Source code: 


Problems that I occur and how I fixed them? 

The problem that occurs is the servo is not smooth when turning. I need to increase the delay time from 15 milliseconds to 150 milliseconds. To make the servo turn smoothly. 

A short video of the executed program work. 


Reflection 

This unicorn challenge is very good for the students like me. It is because it makes me think about how to use the servo motor and to make the changes based on the smoothness or the speed of the wings flapping. Also, to make it more challenging my group and I put a programmable button so that when it press, the wings start to flap. Furthermore, during the competency test, I need to make a traffic light using an onboard LED with no delay. My mistake was by putting delay(0) after digitalWrite(11, LOW). There shouldn't be a delay of 0 because it adds up the program storage space.

Wednesday, 24 November 2021

Laser cutting

Improve standard operating procedure(SOP)

For a start-up, all the steps are the same except for Epilogue FUSION PRO. The compressor will be automatically switched on when the machine switches on. 

For using Corel-Draw, all the steps are the same. 

For the Epilog dashboard, my group SOP did not include "add import material settings". This is an important step because you cannot do engraving or cutting without specifying the material that you use. 


The picture above is the recommended settings for engraving and cutting using wood. This is very new to me and sometimes you can change it (I don't recommend it) haha. 

The shut process is all same, there are no changes to be made. 


Monday, 8 November 2021

CAD

How do I design my keychain in Fusion 360? 

  1. Open Autodesk Fusion 360 software. 
  2. Sketch the design. (by the way, I didn't follow the steps on youtube)


        3. Extrude (2mm)


        4. Extrude the rectangle box (1mm)


        5. Add text inside the rectangle box.


        6. Extrude the text (2mm)


        7.  Your design is finished. 


        8. Add appearance (Optional)


Conclusion
I feel that the more I practice using fusion 360, the better I can design. During school holidays, I practice it and follow youtube tutorials before school reopens. This helps me a lot when I design the keychain on my own in school.  

How do I design my handphone holder? 
        1. Open Autodesk Fusion 360 software. 
        2. Set parametric 


        3. Sketch the design. 


        4. Extrude the main body (Note: Must select new body at operation)


        5. Extrude to make a slit. (Note: Must select cut at the operation)


        6. Extrude the leg of the holder. (Note: Must select new body at operation)


        7. Combine the two bodies and make a cut for the leg of the holder. 
            (Note: target body is the leg (Body2), tool bodies are the main body (Body1). Also, select cut at             the operation.          


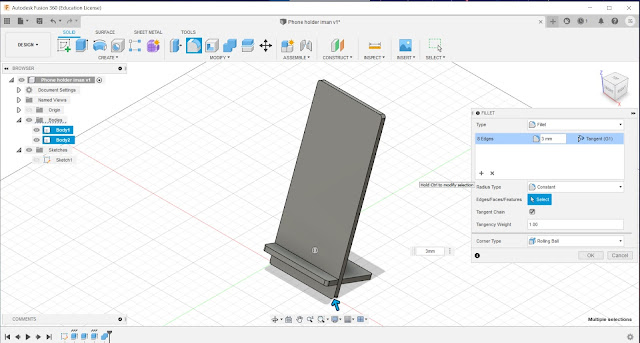
        8. The design is complete. 

Main body design
Leg design

        9. Add fillet to all the edges (3mm)


        10. Add appearance (Optional)


Conclusion 
Using parametric is a powerful tool to use when designing. It can help to make quick changes in the design such as the thickness, width, and height. For the handphone holder, the height can be changed by using parametric. For example, the iPhone X height is 145 mm and iPhone 11 pro max height is 158mm. You can type in the height value + 20 mm leg (based on the design).  


Home

 Hello, my name is Muhammad Iman Bin Muhammad Ghazzali. This is my first blog. I like to watch Anime, Korean and Malay dramas. During my free time, I like to look at a trading chart especially on cryptocurrency 🤑. 


My personal goal in CP5070 is to at least master two skills. The first is using Fusion360. And the second is Arduino programming. Why did I choose these two? It is because to design a project, we need software to make the design and to prototype it. As for Arduino programming, it will be great to combine it with the prototype. It will help to automate the process. 

Ground rules for our team:

  1. Try to be on time during the meeting. 
  2. Seek help when in doubt.
  3. Be respectful to each other.
  4. Do your best. 


Designed By Blogger Templates